Robot Tutorial – Basic Commands
In this tutorial, we'll create a robot and make it move.
Part 1
First, we need to create a robot.
- Click the Block Selector button
- Click the Programming tab
- Click Robot
Well that was easy. Now we open the Robot Editor.
- Click the Edit Program button
Here's the Robot Editor. There are a lot of things to take in but you can ignore most of it for now.
Look at the four buttons labelled Robot, Program, World, and Variables. These are the command buttons, where all the robot commands are. Each button shows a different set of commands when you click it.

- Click the Robot command button and choose Go
A command block has appeared in the editor. This is a command that the robot will carry out when you play the game.

The Go command makes the robot move in a direction for a number of steps. At the moment, the direction is None and the number of steps is 0, which are both pretty useless. We'll change these options now.
- Change the direction to North
- Change the number of steps to 5
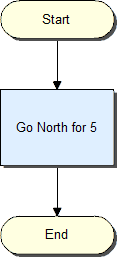
The command block should now look like this:

This is a simple program with just one command. When we run it, it will carry out the steps in this flowchart, from top to bottom:
Let's try it.
- Click the Save Program button in the bottom-right corner
- Now click somewhere near the middle of the board to draw the robot
The robot has a little cog icon  to indicate that it's a robot. That'll come
in handy later when you make hidden robots.
to indicate that it's a robot. That'll come
in handy later when you make hidden robots.
- Click the Play button. The robot should move five squares to the north.
- Press Escape on the keyboard to go back to the editor.
Not very exciting, but it's a start.
Part 2
Before we start this part, you need to know the compass directions. They are:
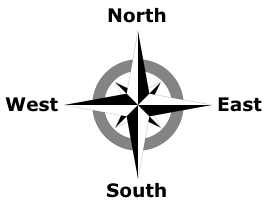
You can remember them with the rhyme "Never Eat Shredded Wheat" *.
Now let's add some more Go commands.- Click the Edit Program button
- Add another Go command and change it to East for 5
- Add another Go command and change it to South for 5
- Add another Go command and change it to West for 5
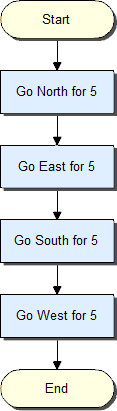
Your program should now look like this:

We're making the robot go north, then east, then south, then west. This will make the robot move in a complete square.
When the program runs, it will carry out each command in turn, like so:
- Click Save Program
- The robot that's already on the board has the old program (with just one Go command). Draw over it to replace it with the new robot and new program
- Click Play
- The robot should run around in a square, then stop.
- Press Escape on the keyboard to go back to the editor.
That's a bit more interesting!
Part 3
We made the robot run in a square once. But can we make it run in a square forever?
We could just add lots and lots and lots of Go commands, but that would get boring very quickly. Instead, we can use a loop.
A loop is where a program carries out the same instructions over and over again, which is exactly what we want here.
- Click the Edit Program button
- Click the Program command button (next to Robot)
- Choose Label
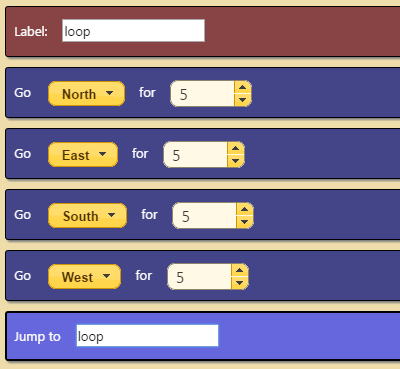
A Label command block will appear, with an empty text box in it.
- Click in the text box and type the word loop

Now we need a Jump To command.
- Click the Program command button again
- Choose Jump to
A Jump To command block will appear. It has an empty text box, just like the Label command block.
- Click in the text box and type the word loop

We need the label to be at the very start of the program. Command blocks can be dragged, so we'll do this now.
- Click on the Label command block (anywhere but the text box) and drag it to the top of the program, before all of the Go commands.
Your program should now look like this:
Let's try it.
- Click Save Program
- The robot that's already on the board has the old program. Draw over it to replace it with the new robot and new program
- Click Play
- The robot should run around in a square and never stop. Try walking in its way, if you like.
- Press Escape on the keyboard to go back to the editor.
Excellent! But how does it work? Well, the Label command doesn't do anything by itself. It just uses the name you entered ('loop') to mark a point in the program that you can use later.
The Jump To command tells the program to jump back (or forward) to the label with the name you entered.
When the program runs, it will carry out each command in turn, until it reaches the Jump To command. It will then jump back to the label and start again. It will keep doing this over and over again.
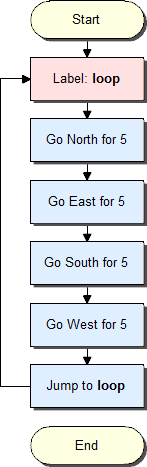
As you can see, the program never reaches its end.
By the way, we didn't have to call the label 'loop'. We could've called it 'orange' or 'unicorn' or anything else, but it's a good idea to name your labels sensibly.
That's all for this tutorial. You've learned about movement, labels, jumps, and basic program flow. These are the foundations on which CodeGroove programs are written, so you're well on your way!
* If you're from the Shredded Wheat company, please don't sue us.